
TL;DR
Moving your rig into another room is the most effective way to cut noise. When placement isn’t an option, proper acoustic treatment and ventilation are key. A closet setup works best as a vocal booth with smart placement and DIY absorption, not sealed soundproofing.
Ever notice how your loud PC or inference rig doesn’t bother you until it’s right next to your microphone? The truth is, the biggest difference in quieting a noisy rig isn’t foam or soundproof paint. It’s about where you put the machine and how you treat its environment.
This guide cuts through the noise—literally. I’ll show you how moving your rig into another room can be the biggest win, how to treat your closet like a vocal booth, and which simple tweaks make a huge difference. Whether you’re recording at home or just want a calmer workspace, these tips help you get better sound without breaking the bank.
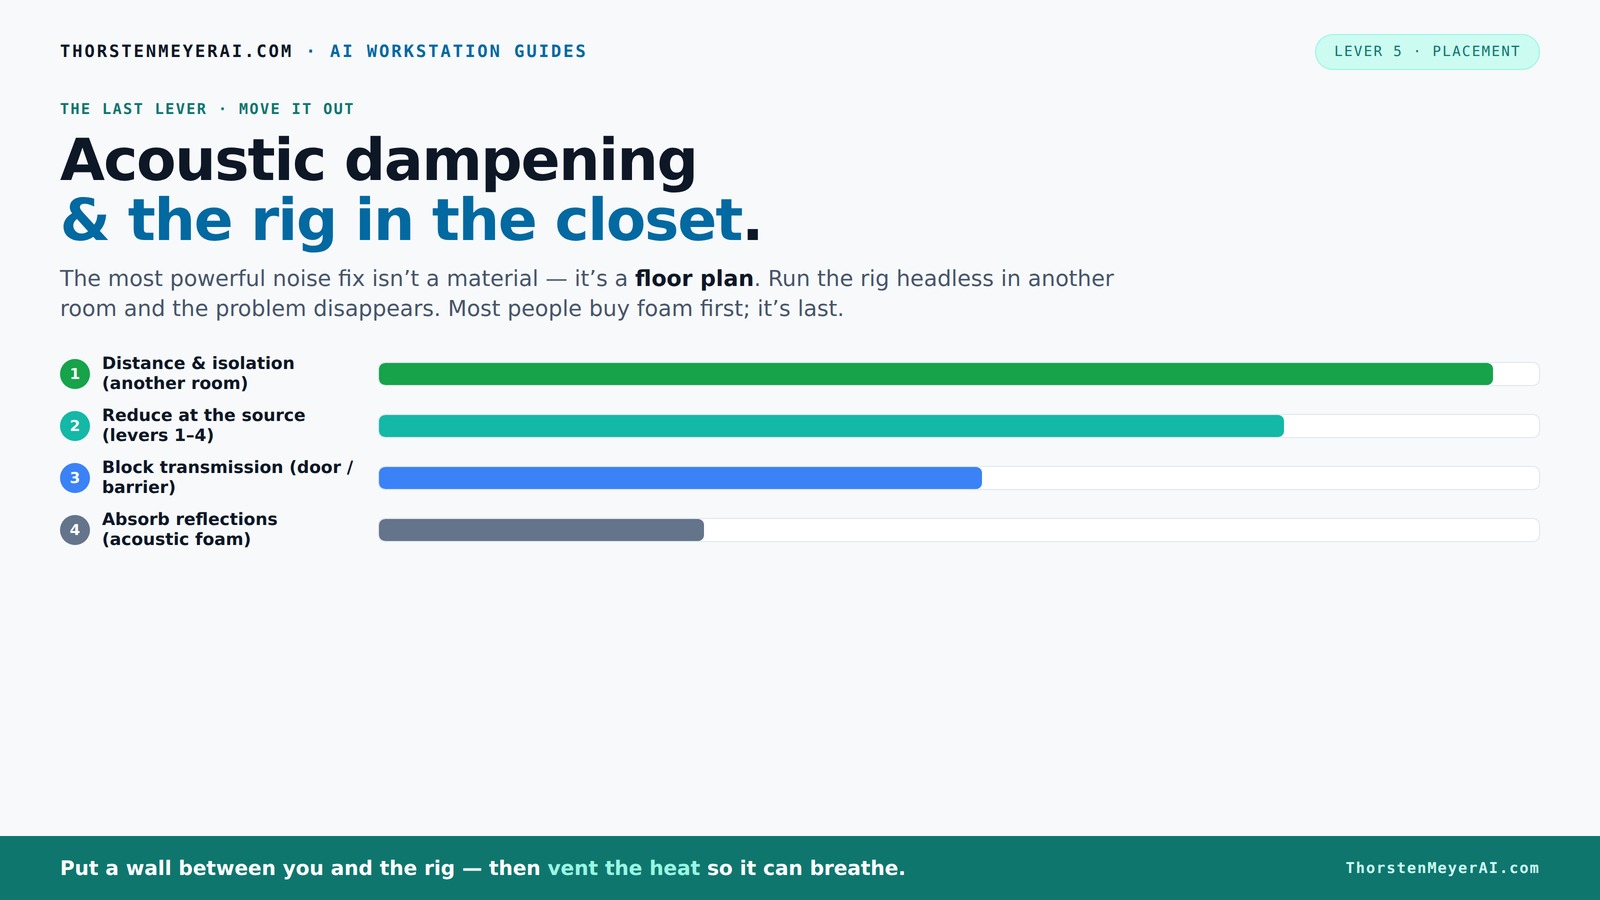
Acoustic dampening
& the rig in the closet.
The most powerful noise fix isn’t a material — it’s a floor plan. A rig you can’t hear because it’s in another room beats any amount of foam. Tap the approaches in Part 1 to see what actually works.
(another room)
(levers 1–4)
(door / barrier)
(acoustic foam)
Contain the noise, not the heat
Key Takeaways
- Moving your rig to another room is the simplest way to cut noise dramatically.
- Treat reflection points with foam or blankets for clearer recordings, especially at first reflection points.
- Ventilation is critical—sealed closets trap heat, which can kill your quiet setup.
- Seal gaps around doors and floors—leakage makes the quietest room useless.
- DIY materials like blankets and mattress foam can outperform costly panels if placed smartly.

72in 3-Panel Soundproof Room Divider with Wheels, Heavy-Duty Acoustic Partition Temporary Wall for Noise Reduction, Portable Divider for Home Hospital Library Classroom - Light Grey
- Noise Reduction: Absorbs at least 85% of noise
- Silent Self-locking Wheels: 12 wheels with 360° rotation and brakes
- Durable and Rust-proof Wheels: Reinforced metal base for longevity
As an affiliate, we earn on qualifying purchases.
As an affiliate, we earn on qualifying purchases.
Why Distance Is Your Best Soundproofing Weapon
Distance and separation are more effective than foam or barriers. If your rig is in another room, the noise drops dramatically—sometimes by over 20 dB—making your workspace peaceful. Think about it: a loud GPU in the next room is barely audible, while the same machine on your desk is a constant hum.
Imagine your setup: your laptop and mic on your desk, the noisy tower tucked away in a closet or basement. You SSH into the rig or access it via a network. This way, the noise just doesn’t reach you. It’s the simplest, most cost-effective fix, and it’s often overlooked.
All you need is a reliable wired connection or strong Wi-Fi, and enough ventilation to keep the rig cool. No fancy treatments needed—just a wall, door, or wall-to-wall separation. It’s the "set it and forget it" solution for most high-power AI rigs.
The 'Rig in the Closet' Setup — How It Works and Its Big Catch
Putting your rig in a closet or cabinet is a smart way to silence it. The soundproofing comes from lining the space with foam or blankets and sealing gaps around the door. But here’s the kicker: heat can become a nightmare if you don’t plan for airflow.
Think of it like a mini sauna for your PC. A sealed closet traps hot air, causing temperatures to rise. When components heat up, they throttle, and fans scream to cool down. That defeats the whole purpose of quiet and cool. Proper ventilation is essential.
To fix this, you need active ventilation: vents, exhaust fans, or ducted airflow. Some fancy soundproof cabinets combine foam lining with HVAC-style cooling—quiet fans, thermostats, and ductwork—so your rig stays cool and silent. For DIY, a simple exhaust fan with a vent hole can make all the difference.
Understanding this tradeoff is crucial: while a closet can significantly reduce noise, neglecting heat management risks hardware performance and longevity. Proper ventilation ensures you get the silence without sacrificing hardware health.
Acoustic Dampening in Small Spaces: Absorption, Reflection, and Noise Blocking
In tiny spaces like closets, acoustic dampening isn't just about making things sound better—it's about controlling how sound behaves within a confined environment.
But absorption alone doesn’t guarantee silence; it improves clarity and reduces echo. The tradeoff is that if you only treat the inside surfaces without sealing gaps or blocking sound transmission, noise can still escape through cracks or vents. That’s why understanding the role of reflection points and sound leaks is vital. Proper treatment involves both absorption at critical reflection points and sealing gaps around doors or vents to prevent sound from leaking out or in.
For example, placing foam panels at the reflection points—such as behind the mic and on side walls—reduces echo, making your recordings clearer and more professional. Thick panels (2-4 inches) are especially effective at absorbing lower frequencies, which tend to cause muddiness in small rooms. Sealing gaps around doors with weatherstripping or sound-blocking seals helps prevent sound leaks.
In practice, layering blankets over the door, strategically placing foam panels, and adding bass traps in corners creates a focused vocal booth that minimizes echo and sound leaks, delivering a more professional sound environment.
Placement Tips: Setting Your Mic and Absorption for Perfect Sound
Where you place your mic and absorption panels can make or break your sound quality. Proper placement reduces unwanted reflections and ensures your voice sounds natural and clear. Start by positioning the mic in the optimal spot—usually in the room’s center, slightly away from walls—to minimize reflections bouncing directly into the capsule. Then, treat the reflection points—these are spots where sound waves bounce off surfaces and reach your mic, causing echo and coloration.
Using a mirror is a simple trick: hold it against the wall and find where your mic’s reflection appears, then place foam panels at those points. This targeted approach greatly reduces early reflections that color your recordings. Additionally, placing foam on the ceiling directly above the mic can cut down on reflections from above, which are often overlooked but impactful in small spaces.
Thicker panels (4 inches or more) absorb lower frequencies, preventing the boomy, muddy sounds that small rooms often produce. Combining these treatments with proper mic placement results in a focused, natural sound that’s professional and clear.
Here’s a quick setup:
- Position mic near the room’s center, slightly away from walls
- Place foam behind the mic at reflection points identified with the mirror trick
- Treat the ceiling directly above the mic to minimize overhead reflections
- Add bass traps in the corners if low-end muddiness persists
Sealing the Door and Floor: Stop Sound Leaks at the Weak Spots
The most common sound leaks in a closet setup occur around the door edges and the floor. Gaps and cracks act like tiny portals for sound to escape, undermining any acoustic treatment you apply inside. For more tips on sealing these weak spots, see this guide.
Applying weatherstripping or draft seals around the door frame is a cost-effective way to block noise leaks. It prevents sound from sneaking out through gaps, which is especially important if you’re trying to keep noise in or out. For the floor, adding a thick rug or foam pad underneath your equipment helps absorb vibrations and prevents sound from bouncing into adjacent spaces. If you’re aiming for maximum isolation, sealing the door edges with acoustic sealant provides an extra layer of soundproofing, preventing even the tiniest leaks.
Another simple method is hanging a heavy blanket or curtain over the door—this not only muffles sound but also adds an extra barrier. Remember, treating the weak points—gaps around the door and floor—often yields more noticeable noise reduction than just adding foam to the walls. The key is sealing these leaks to contain the sound within your treated space, making your overall setup more effective and efficient.
Frequently Asked Questions
Is acoustic foam enough to soundproof a closet?
No, acoustic foam mainly absorbs reflections and reduces echo. It does not block sound transmission. For true soundproofing, you need barriers and sealing, not just foam.Where should I place foam or panels in a closet booth?
Place foam at reflection points—behind the mic, on side walls, and the ceiling. Use a mirror trick to find the first reflection points for maximum effect.Do I need bass traps in a small vocal booth?
Yes, if you notice low-end muddiness or boominess. Small rooms often cause low-frequency buildup, which bass traps in the upper corners can tame effectively.Should I put treatment on the walls, ceiling, door, or corners first?
Start with reflection points on walls and ceiling. Seal gaps around the door. Add bass traps only if low-frequency issues are present.How do I reduce echo without making the room sound dead or boxy?
Treat reflection points selectively, avoid over-absorbing, and leave some natural room sound. Combining absorption with diffusion helps keep a lively yet controlled sound.Conclusion
The secret to a quiet, effective closet rig isn’t just about foam or sealing; it’s about where you place your gear and how you treat the space. Moving your machine into another room often wins more than any treatment.
But if you want to keep it close, focus on reflection points, sealing leaks, and proper ventilation. A little effort goes a long way toward better sound and cooler hardware. So, what’s stopping you from turning that closet into your new favorite studio?